

Tuesday, March 31, 2009

Monday, March 30, 2009
Weekly Design Team Design Tip!
Hi there...Lisa here!
For this weeks Design Tip, let's talk Titles! I find that all of my most favorite layouts have titles created with multiple fonts or types of letters. It is very effective in keeping the eye moving through the layout. My favorite way of doing this is with letter stickers and a three dimensional letter, such as Thickers. In this first example, I used Pink Paislee alphabet stickers and American Crafts Thickers to create the title. I like to nestle part or all of the smaller word into the larger word as well.
 For this next example, I used three different lettering products...the first was some "vintage" Heidi Swapp plastic letters (I loved this product and have been hoarding them!), then, Glittered Chipboard Thickers, and lastly, Vinyl Thickers...again, part of the title has been "nestled" into the other...

For this last example, I used my beloved little Making Memories Tiny letter stickers and Thickers again...

Tuesday, March 24, 2009
Weekly Challenge 3/23
This challenge is all about Squares
Use at least nine squares on your project/layout, with at least three of them being photos.
Here are some examples from the DT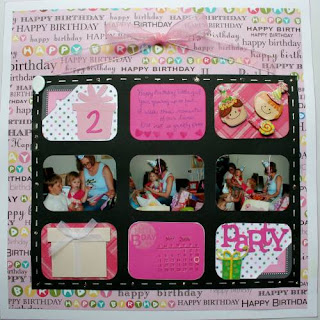
To view the thread go to
http://www.croppinparadise.com/forums/viewtopic.php?t=5952&highlight=
Can't wait to see what everyone creates.
Thanks for viewing the challenge
Scrappin_Katt
Use at least nine squares on your project/layout, with at least three of them being photos.
Here are some examples from the DT


To view the thread go to
http://www.croppinparadise.com/forums/viewtopic.php?t=5952&highlight=
Can't wait to see what everyone creates.
Thanks for viewing the challenge
Scrappin_Katt
Monday, March 23, 2009
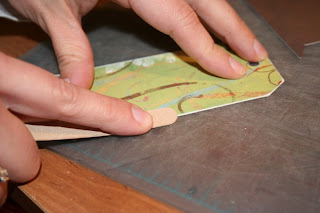
Design Tip: Sanding
I love to sand the edges of my photos & papers! I actually started sanding & distressing the edges as a way to hide my imperfect cutting skills! ;)
I have often been asked how I sand my edges - it seems a lot of scrappers hold their paper and their files in the air as if they were inking the edges of their papers or photos. I actually lay my papers or photos on a cutting mat that I use specifically for sanding because it leaves the cutting mat dirty.
I use the inexpensive nail files or more recently I have discovered the Basic Grey Precision File Set - which is AWESOME!!! I own two of the BG file sets & if there is ever talk of them discontinuing them, I will stockpile them! :)
Here is a close up of a mini book cover sanded edges. I sanded the photo edges with a file & instead of cutting the paper around the scalloped minibook, I just used the small rounded metal files in the BG file set.
Here is how I file the edges of paper & photos:
If you have any questions, just let me know!
I hope you give sanding a try & post your work in my Design Tip thread so I can check it out!
~Carolyn
I have often been asked how I sand my edges - it seems a lot of scrappers hold their paper and their files in the air as if they were inking the edges of their papers or photos. I actually lay my papers or photos on a cutting mat that I use specifically for sanding because it leaves the cutting mat dirty.
I use the inexpensive nail files or more recently I have discovered the Basic Grey Precision File Set - which is AWESOME!!! I own two of the BG file sets & if there is ever talk of them discontinuing them, I will stockpile them! :)
Here is a close up of a mini book cover sanded edges. I sanded the photo edges with a file & instead of cutting the paper around the scalloped minibook, I just used the small rounded metal files in the BG file set.

Here is how I file the edges of paper & photos:

If you have any questions, just let me know!
I hope you give sanding a try & post your work in my Design Tip thread so I can check it out!
~Carolyn
Wednesday, March 18, 2009
3/18 Inspirational Challenge
This Weeks Inspiration is about Photo's with a twist.
Photo's are my inspiration-

My challenge is to take this beautiful photo
Make a layout/project based on what the photo inspires to create. It can be anything as your inspiration like a color, shapes, lines, theme etc.

I was inspired by color, waves, tree, and sun.
Thanks for checking out my challenge, I can't wait to see what everyone creates. Have fun!!
Sunday, March 15, 2009
Design Tip Number 1 . ..
Hello CP blog followers . . . it's a pleasure to meet you. My name is Andrea Tuttle, and I am an excited member of the new CP Design Team. One of my first assignments is to share a design tip with you.
Recently I was published in Simple Scrapbooks latest specialty issue titled: Scrapbook Play with Photos. My trick with the photo play was to create a silhouette of a person using a profile picture of them and then using the silhouette to create a really cool layout.
Here is one of my examples:
 Note: This is not the published layout!!
To create this layout, I simply took profile pictures of my daughters. Then I blew up the images to 5 x 7, I even shrank some to wallet size for another project that I did, too. Then I carefully clipped the photo to a piece of black card stock. I used my extra sharp scissors to cut out the profile of my daughter. I found a quote, wrote it on a rectangle sheet of white card stock and then mounted that on to a frame that I hand cut out of another sheet of black card stock. I adhered the whole project to a brightly colored piece of card stock and then added a few embellishments. Easy and fun!!
Here is another project that I created using the same designs only on a smaller scale:
 And here is the layout that was published:
 Thanks, and I hope that you'll try this quick and fun design tip!!
Wednesday, March 4, 2009
The new product just keeps rolling in!!!
Ok, it was only a few posts ago that I told you we hit 900 new products - well now we are well beyond 1100 in the last 45 days!! If you haven't stopped by Paradise lately you are missing: Quickutz, Carolee's Creations (Adornit), Queen and Co., Little Yellow Bicycle, Daisy Bucket, DCWV and more!!! Go check them out at CroppinParadise.com!
Subscribe to:
Posts (Atom)


